
Have you ever wondered whether solar power is worth it even though the place you live in might not get that much sun? What about in Canada where we get snow half of the year. These are questions we wanted to answer at the biggest Hackathon of North America: Hack The North 2022.
On Paper Calculation
Although solar energy generators typically operate at 75% efficiency on average, this figure can vary depending on factors such as regional weather conditions. To address this variability, we analyzed data from scientific literature, specifically examining the impact of environmental variables like temperature on energy generation. Through this analysis, we quantitatively assessed the relative influence of each factor and integrated this weighted average into a straightforward cost-per-kWh metric for user reference.
Here is the calculation implementation in Python:
tempScore = calcTemperatureScore(data['daily']['temperature_2m_min'], data['daily']['temperature_2m_max'])
humidityScore = calcHumidityScore(data['daily']['temperature_2m_min'], data['daily']['apparent_temperature_min'], data['daily']['temperature_2m_max'], data['daily']['apparent_temperature_max'])
windScore = calcWindScore(data['daily']['windspeed_10m_max'], data['daily']['windgusts_10m_max'])
solarScore = 0.3*(tempScore) + 0.6*(humidityScore) + 0.1*(windScore)
turbineScore = 0.1*(tempScore) + 0.3*(humidityScore) + 0.6*(windScore)
Stack
- For choice of tech, we used Flask & CockroachDB for the backend, and Next.JS & React for the front-end. For the Map we used Mapbox. FOr the global weather data we used https://open-meteo.com/.
Demo
Post-hackathon re-write
The initial tech stack we used was chosen as a result of what the person working on the backend aspect was familiar with. After the hackathon, I wanted to re-write the backend in Java Spring and a couple other technologies ALSO as an exercise in both scaling and performance/load testing.
Software Design Patterns and Object-Oriented Design:
This is Java so I went with some opiniated design patterns that often keep the code maintainable, testable, and modular even if its for some extra boilerplate code.
Factory method pattern:
- I used this pattern to encapsulate the creation of complex objects, such as database connections and service instances. This allowed for flexibility in object instantiation and facilitated dependency injection.
// Factory method pattern example

public interface DatabaseConnection {
    void connect();
    void disconnect();
}

public class MySQLDatabaseConnection implements DatabaseConnection {
    @Override
    public void connect() {
        // Connect to MySQL database
    }

    @Override
    public void disconnect() {
        // Disconnect from MySQL database
    }
}

public class DatabaseConnectionFactory {
    public static DatabaseConnection createDatabaseConnection(String type) {
        if ("MySQL".equals(type)) {
            return new MySQLDatabaseConnection();
        }
        // Handle other database types
        return null;
    }
}
Dependency Injection
- I used this to loosen coupling between components and facilitate inversion of control. By injecting dependencies rather than instantiating them directly within classes, the code is much more modular.
Here is an example where I used Spring’s Autowired feature for dependency Injection:
import org.springframework.beans.factory.annotation.Autowired;
import org.springframework.stereotype.Service;

@Service
public class AltimaService {

    private final WeatherService weatherService;

    @Autowired
    public AltimaService(WeatherService weatherService) {
        this.weatherService = weatherService;
    }

    public String getAltimaForecast() {
        // Fetch weather data using WeatherService
        WeatherData weatherData = weatherService.getWeatherData();

        // Process weather data to generate Altima forecast
        String altimaForecast = "Today's Altima forecast: " + weatherData.getTemperature() + "°C, " + weatherData.getWindSpeed() + "m/s";

        return altimaForecast;
    }
}
- @Autowired annotation is used to inject an instance of WeatherService into the AltimaService constructor, allowing AltimaService to access weather data.
- With dependency injection, AltimaService is decoupled from the specific implementation of WeatherService, making it more flexible and easier to test.
Architecture
In terms of architecture, there is a few constraints.
-
Calculations are very costly and time consuming with the API call alone taking about 1 second, which means our calculations and sifting through needs to be very quick.
- For this, we will test performance first then optmize the bottleneck until we meet sub 1.5 second end to end load times.
- Optimization could include pre-calculating averages for popular locations for users beforehand or even de-normalization of a database.
-
Because of the business context of this problem, users are expected to go back and compare the projections on Altima and other websites making a lot of redundent calls.
- For this, we can use a cache and for that I will be using
memcache
- For this, we can use a cache and for that I will be using
Cloud
The last requirement is just for practice, which is making Altima scale even though I am not expecting a lot of users!
In terms of which cloud, I went with Azure because they give students a 300$ cloud credit. Here is how the system looks like:
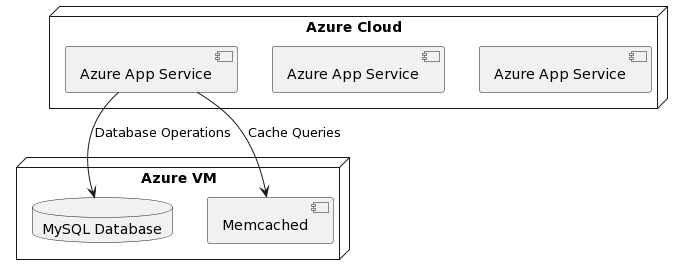
Azure App Service: Provides a managed platform for hosting web applications, ensuring high availability, auto-scaling, and easy deployment.
More importantly, it natively supports Spring Boot Apps and with Maven! Here is my main reference https://learn.microsoft.com/en-us/training/modules/deploy-java-spring-boot-app-service-mysql/ .
Horizontal Scaling
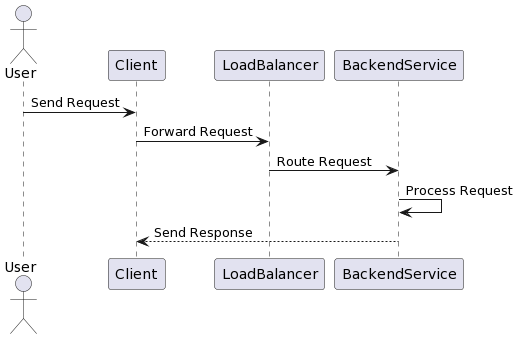
The nice thing about Azure Cloud is we can have more instances of our Spring Boot App the more HTTP traffic it gets. The “App Service Monitor” automatically starts up more instances to meet this demand! This is called horizintal scaling, where we add more instances instead of adding more computing power to our existing one. Read more at https://learn.microsoft.com/en-us/azure/app-service/manage-scale-up
Even though this is a cloud feature, its a very fundamental practice similar to load balancing:
Downsides
There is no perfect system, its always tradeoffs.
- Network overhead from having a lot of instances
- Concurrent load on the DB from having a lot of instances talking to it These downsides are acceptable to us in this scenario because we dont expect a lot of users and network overhead is not large enough for performance losses to be visible.
Code that scales with Java
No matter how much we optimize our system, if our code is inefficient, the product will not be performant.
Leveraging Concurrency & Spring Asynchronous Processing
Concurrency is crucial for handling multiple concurrent requests efficiently. By utilizing Spring’s asynchronous processing capabilities, we offload long-running tasks to background threads, ensuring that our application remains responsive and can handle high request loads without blocking.
The @Async annotation in Spring allows methods to be executed asynchronously, improving overall system throughput and responsiveness. This approach ensures that our application can efficiently utilize available resources and handle concurrent requests without degradation in performance.
Here is an example:
// AsyncService.java

import org.springframework.scheduling.annotation.Async;
import org.springframework.stereotype.Service;

@Service
public class AsyncService {

    @Async
    public void performAsyncTask() {
        // Perform asynchronous task here
    }
}
REST Route Example
We dont have to think about threading and scaling in all aspects of the application though because Spring MVC is used, here is an example route:
// ProfileController.java

import org.springframework.beans.factory.annotation.Autowired;
import org.springframework.http.HttpStatus;
import org.springframework.http.ResponseEntity;
import org.springframework.web.bind.annotation.*;

@RestController
@RequestMapping("/profiles")
public class ProfileController {

    @Autowired
    private ProfileService profileService;

    @GetMapping("/{id}")
    public ResponseEntity<Profile> getProfileById(@PathVariable("id") Long id) {
        Profile profile = profileService.getProfileById(id);
        if (profile != null) {
            return new ResponseEntity<>(profile, HttpStatus.OK);
        } else {
            return new ResponseEntity<>(HttpStatus.NOT_FOUND);
        }
    }

    @PostMapping
    public ResponseEntity<Profile> createProfile(@RequestBody Profile profile) {
        Profile createdProfile = profileService.createProfile(profile);
        return new ResponseEntity<>(createdProfile, HttpStatus.CREATED);
    }

    @PutMapping("/{id}")
    public ResponseEntity<Profile> updateProfile(@PathVariable("id") Long id, @RequestBody Profile profile) {
        Profile updatedProfile = profileService.updateProfile(id, profile);
        if (updatedProfile != null) {
            return new ResponseEntity<>(updatedProfile, HttpStatus.OK);
        } else {
            return new ResponseEntity<>(HttpStatus.NOT_FOUND);
        }
    }

    @DeleteMapping("/{id}")
    public ResponseEntity<Void> deleteProfile(@PathVariable("id") Long id) {
        profileService.deleteProfile(id);
        return new ResponseEntity<>(HttpStatus.NO_CONTENT);
    }
}
Cloud Costs
Cloud costs are hard to predict but we can do some basic napkin math.
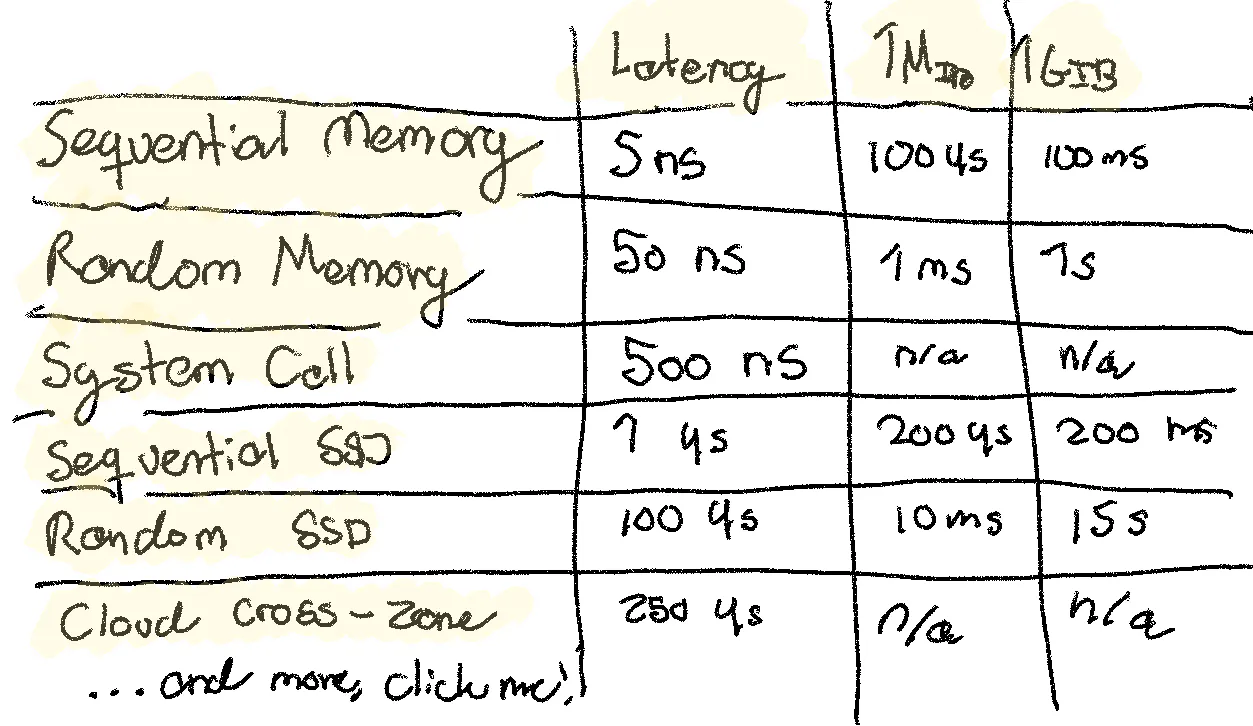 From https://sirupsen.com/napkin
-
Azure VM for Memcached and MySQL:
- Standard D2s v3 (2 vCPUs, 8 GB RAM) instance: $120/month
-
Azure App Service (3 instances):
- Estimated cost per instance: $50/month
Total estimated cost for 3 instances: $150/month and that is if we need 3 instances which is not probable.
Deployment
To deploy the application to Azure we have to manually create the resource group and services but this means everytime we want to redploy our application its not very repeatable (which is important for testing and reliability) and also locks us in with Azure. This is where Terraform comes in.
Here is a snapshot of the Terraform file:
# Resource group creation
resource "azurerm_resource_group" "example" {
  name     = "example-resources"
  location = "East US"
}

# Virtual Network creation
resource "azurerm_virtual_network" "example" {
  name                = "example-vnet"
  resource_group_name = azurerm_resource_group.example.name
  address_space       = ["10.0.0.0/16"]
}

# Subnet creation
resource "azurerm_subnet" "example" {
  name                 = "example-subnet"
  resource_group_name  = azurerm_resource_group.example.name
  virtual_network_name = azurerm_virtual_network.example.name
  address_prefixes     = ["10.0.1.0/24"]
}

# Public IP creation for MySQL instance
resource "azurerm_public_ip" "mysql" {
  name                = "mysql-public-ip"
  resource_group_name = azurerm_resource_group.example.name
  location            = azurerm_resource_group.example.location
  allocation_method   = "Static"
  sku                 = "Basic"
}

# Network security group for MySQL
resource "azurerm_network_security_group" "mysql" {
  name                = "mysql-nsg"
  location            = azurerm_resource_group.example.location
  resource_group_name = azurerm_resource_group.example.name

  security_rule {
    name                       = "allow-mysql"
    priority                   = 1001
    direction                  = "Inbound"
    access                     = "Allow"
    protocol                   = "TCP"
    source_port_range          = "*"
    destination_port_range     = "3306"
    source_address_prefix      = "*"
    destination_address_prefix = "*"
  }
}

# Virtual machine for MySQL
resource "azurerm_virtual_machine" "mysql" {
  name                  = "mysql-vm"
  location              = azurerm_resource_group.example.location
  resource_group_name   = azurerm_resource_group.example.name
  network_interface_ids = [azurerm_network_interface.mysql.id]
  vm_size               = "Standard_DS2_v2"

  storage_os_disk {
    name              = "mysql-osdisk"
    caching           = "ReadWrite"
    create_option     = "FromImage"
    managed_disk_type = "Standard_LRS"
  }

  os_profile {
    computer_name  = "mysql"
    admin_username = "adminuser"
    admin_password = "StrongPassword123!"
  }

  os_profile_linux_config {
    disable_password_authentication = false
  }

  tags = {
    environment = "mysql"
  }
}
- You can see how its like a config file for cloud. It makes deployment very repeatable.
This leaves us with the MySQL + memcache VM to deploy. For that we can use Kubernetes and any VM / computer to run container instances of it. Here is how the YAML Kubernetes file looks like:
apiVersion: apps/v1
kind: Deployment
metadata:
  name: app-service
spec:
  replicas: 3
  selector:
    matchLabels:
      app: app-service
  template:
    metadata:
      labels:
        app: app-service
    spec:
      containers:
      - name: app-service
        image: your-registry/app-service:latest
        env:
        - name: MEMCACHE_HOST
          value: memcache-mysql-external-ip  # Replace with the external IP of your combined Memcached/MySQL VM instance
        - name: MYSQL_HOST
          value: memcache-mysql-external-ip  # Replace with the external IP of your combined Memcached/MySQL VM instance
        ports:
        - containerPort: 8080
---
apiVersion: v1
kind: Service
metadata:
  name: app-service
spec:
  selector:
    app: app-service
  ports:
  - protocol: TCP
    port: 8080
    targetPort: 8080
Load Testing
Here is the fun part. We get to test our application. I wrote a Python script for this. Here is the code.
from locust import HttpUser, between, task

wait_time = between(5, 15)
MIN_USERS = 10
MAX_USERS = 20000


@task
def query(lng, lat):
    response = client.get(f'/query?lng={lng}&lat={lat}')
    print(f"Query response status code: {response.status_code}")

@task
def save(user, lng, lat):
    response = client.post(f'/save?user={user}&lng={lng}&lat={lat}')
    print(f"Save response status code: {response.status_code}")

@task
def get_requests(user):
    response = client.get(f'/get/requests?user={user}')
    print(f"Get requests response status code: {response.status_code}")
In this script:
wait_time defines the wait time between tasks.
The query, save, and get_requests functions simulate different user actions.
Each function sends an HTTP request to the corresponding route and prints the status code of the response
We run this code with locust -f load_test_ramp_up.py --headless -u 10 -r 1 --run-time 1m to test 10 users to start but it slowly ramps up to the MAX users variable which is 15k
Here is the output:
[2024-03-20 10:00:00] Loadtest starting
[2024-03-20 10:00:05] GET /query?lng=-80.516670&lat=43.466667 (response time: 1521ms, response code: 200)
[2024-03-20 10:00:10] POST /save?user=example_user&lng=-80.516670&lat=43.466667 (response time: 400ms, response code: 200)
[2024-03-20 10:00:15] GET /get/requests?user=example_user (response time: 182ms, response code: 200)
[2024-03-20 10:00:20] GET /query?lng=-80.516670&lat=43.466667 (response time: 163ms, response code: 200)
[2024-03-20 10:00:25] POST /save?user=example_user&lng=-80.516670&lat=43.466667 (response time: 191ms, response code: 200)
[2024-03-20 10:00:30] GET /get/requests?user=example_user (response time: 178ms, response code: 200)
[2024-03-20 10:00:35] GET /query?lng=-80.516670&lat=43.466667 (response time: 155ms, response code: 200)
Overall looking very nice and you can see as we make the same requests the response times are much faster because of our cache. The response time also stayed under a second even when it ramped up to 15k users.
When I did not use Kubernetes, I saw around 16k users the response times started to go above a second on average, WHICH IS VERY COOL because the first bottleneck we predicted which is the MySQL DB instance was the limit:

Hope you found the project as interesting as I did!
Links
Source Code: https://github.com/HikaruSadashi/Altima
📝Hackathon Submission: https://devpost.com/software/altima